WordPress is one of the best platforms for building websites. It is easy to use, even for beginners. One of the coolest features of WordPress is that you can change the look and feel of your site without needing to know coding. You do this by customizing your theme settings.
In this tutorial, we will explain how to customize your theme settings in WordPress. By the end, you’ll be able to design your site the way you want!
How to Customize Theme Settings in WordPress
Step 1: Sign in to WordPress
The first step is to log in to your WordPress website.
- Open a web browser and type in your website’s URL. Add
/wp-adminat the end (for example,www.example.com/wp-admin). - Enter your username and password.
- Click the Log In button.
Once you log in, you’ll see the WordPress dashboard, which is your control panel for the site.
Step 2: Go to the Customize Section
Now that you’re logged in, it’s time to find the customization area.
- Look at the menu on the left side of your dashboard.
- Click on Appearance.
- From the dropdown menu, select Customize.
Important Note:
If you see Editor instead of Customize, your theme uses the new WordPress Site Editor. This guide focuses on the classic Customize feature. You can switch to the new editor by following WordPress’s official instructions.
Step 3: Customize Your Site
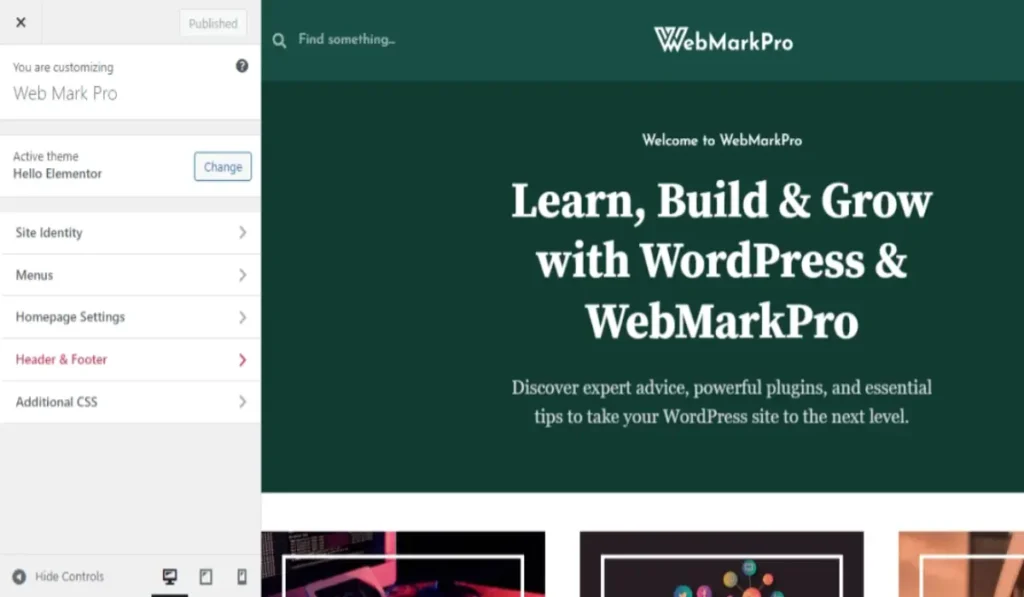
When you open the Customize section, you’ll see a live preview of your website on the right side and a menu on the left side. The menu has all the customization options. These may vary depending on your theme, but we will cover the most common ones.

1. Site Identity
The first option in most themes is Site Identity. This is where you set your website’s name and logo.
Steps to Edit Site Identity:
Click on Site Identity in the menu.
You’ll see options for:
- Site Title: This is the name of your website. For example, “John’s Blog.”
- Tagline: This is a short description of your site. For example, “A blog about travel and food.”
- Logo: This is an image that represents your site. Click on Select Logo to upload or choose a logo from your media library.
- Site Icon: Also known as a favicon, this is the small image that appears next to your site name in the browser tab. Upload an image to set this.
Make your changes, and watch the live preview update on the right.
Once you’re happy, click Publish to save your changes.
2. Site Design
The design section lets you adjust your site’s colors, fonts, and overall layout.
Steps to Edit Site Design:
- Click on Site Design or a similar option like Colors and Fonts.
- You’ll see options for:
- Colors: Choose the color scheme for your site. For example, you can change the background color or the color of your text.
- Fonts: Pick the style and size of the text on your site. Some themes offer preset font combinations, while others let you customize each element (like headings and paragraphs).
- Try different settings and see how they look in the preview.
- Once you find a design you like, click Publish.
3. Header
The header is the top part of your site. It usually contains the logo, navigation menu, and sometimes a banner or image.
Steps to Customize the Header:
- Click on Header in the Customize menu.
- Depending on your theme, you’ll see options to:
- Add a Header Image: Upload an image to display in the header.
- Edit the Menu: Choose which pages or links appear in the navigation menu.
- Adjust Layout: Some themes let you change the header layout, like moving the logo to the center or side.
- Make your changes and preview them.
- Don’t forget to click Publish when you’re done.
4. Footer
The footer is the bottom part of your website. It often contains links, copyright information, or social media icons.
Steps to Customize the Footer:
- Click on Footer in the menu.
- You’ll see options like:
- Footer Text: Edit the text that appears at the bottom, like “© 2024 Your Site Name.”
- Widgets: Some themes let you add widgets to the footer, such as a search bar or recent posts.
- Footer Layout: Choose how many columns or sections the footer should have.
- Adjust the settings to match your needs.
- Click Publish to save your changes.
5. Social
Most themes include a section for adding social media links. These links let visitors find your profiles on platforms like Facebook, Twitter, or Instagram.
Steps to Add Social Links:
- Click on Social or a similar option like Social Media Links.
- Enter the URLs for your social media profiles. For example:
- Facebook:
https://www.facebook.com/YourPage - Twitter:
https://www.twitter.com/YourHandle
- Facebook:
- Some themes also let you choose the style of social icons (e.g., round, square, or colorful).
- Preview the changes and click Publish.
6. Site Settings
The Site Settings section lets you adjust things like typography, layouts, or background images.
Steps to Change Site Settings:
- Click on Site Settings or similar options.
- Adjust settings like:
- Typography: Change the font size and spacing for text.
- Background Image: Upload an image to use as the site’s background.
- Layout Options: Choose between full-width, boxed, or other layouts.
- Experiment with different settings and check the preview.
- Save your changes by clicking Publish.
7. Homepage Settings
The homepage is the first page visitors see when they visit your site.
Steps to Set the Homepage:
- Click on Homepage Settings.
- Choose one of the following options:
- Your Latest Posts: Display your most recent blog posts.
- A Static Page: Choose a specific page to be your homepage. For example, if you created an “About Us” page, you can set it as your homepage.
- Select the page you want from the dropdown menu.
- Click Publish to apply the changes.
8. Additional CSS
If you know a little about coding, you can add custom CSS to further customize your site.
Steps to Add CSS:
Click on Additional CSS in the Customize menu.
Write your CSS code in the box. For example, you can change the color of headings with this code:
h1 {
    color: blue;
}
Check the live preview to see your changes.
Click Publish when you’re satisfied.
Step 4: Publish Your Changes
Once you’ve made all the changes, click the Publish button at the top of the Customize menu. This saves your updates and makes them live on your website.
Customizing your WordPress theme is a fun and easy way to make your website unique. Whether you want to change the colors, add a logo, or design the layout, WordPress gives you all the tools you need.
Related: How to Create a Custom Theme WordPress using HTML5


